Sunday, December 30, 2012

Plan Ahead or Plan 4 Heads

While discovering the fantastic things that could be created with cast resin, I decided I wanted to do a complicated cast of a life-sized head.  This piece would be entitled "Four Generations".  The tricky part was to include all four heads in one piece.  My plan was to cast a small baby head, a young boys head, a young mans head, and an old mans head.  I was familiar with the wax model, plaster of Paris mold process so started.  After shaping the babies head, it was coated with plaster and set to dry.  Removal of the wax was accomplished by heating the mold and letting the melted wax drain out through a hole in the base.  The babies head was cast in a dark brown resin, poured through the hole in the base of the mold.  To eliminate overheating a conservative amount of catalyst was mixed with the resin and small batches were poured over a considerable amount of time.  I had learned the hard way that large pours create excessive heat and crack the resin casting.

When cool and solid the plaster mold was chipped away from the resin head.  The babies head was cleaned and set aside.  Modeling the boys head had to be scaled large enough to accommodate the baby head in the same mold.  Do you see the pattern evolving; model the head, cast the mold on it, melt out the wax, suspend the previous cast head in the mold, cast the resin of the next head around it, remove the mold, etc.  I thought I had a winner and could hardly waite until that last cast of the old man came out of the mold and was polished up.  To my dismay the three heads inside didn't show up clearly even though I had used a different colored resin for each of them.  The main problem was the many wrinkles in the old mans face distorted the inner images.  I tried focusing a light on the head from different angles which helped a small amount.  Below are photos of the head in different poses.  You be the judge.  The baby is in dark brown, the boy is in red and the man is in blue.


I would like to try this project again and use very smooth stylized heads or similar objects.  I have also thought of casting each object so that they protrudes at different amounts below the base.  Light travels through cast resin and highlights the edges.  If light was concentrated on one objects end at the base it would in theory highlight that objects edges.

Well, as they say,"back to the drawing board".  Ideas are welcome on this unsolved project and credit will be noted to those who solve it.

E-mail is: apatchablue3@comcast.net
Website is: apatchablue.com
Facebook:  www.facebook.com/edwin.hill.100
Pinterest:  https://pinterest.com

Saturday, December 29, 2012

Full Moon Rising

I have always been impressed with some of the fine wall hangings that used a backing fabric and colored threads to create a picture.  They are called tapestry and I viewed them as painting a picture with fabric.  I wanted to try a similar process but with wood.  I constructed frames with Masonite backing for six pieces of varying dimensions.  The largest was 4' x 3' and 1"deep.  It was an impressionistic desert view using wood from the desert.

The second piece completed was a smaller 2' x 2', more realistic work called "Full Moon Rising".  It is the last one completed to date, however plans are developed for several others in this series which I call wood tapestry.

The photo of the last wood tapestry is shown on the right and I will point out construction details.   At the outset I must give credit to my wife, JoAnn, for the color scheme and painting.  We plan to collaborate on future pieces in this series.  The mountain and cloud shapes are made of elm wood.  The mountains pieces are cut like puzzle pieces and fastened with screws from the back.

The wood used along the bottom edge of the scene is Catclaw mimosa or "wait-a-minute" bush as dubbed locally.  The re-curved spines resemble a cats claw, hence the common name.  The rational for the nick name is obvious when you try walking through a thicket of this brush. The bush doesn't get large, but the wood has an interesting shape.  The sapwood is a light yellowish white and heart wood a deep reddish brown as shown unpainted in the wood tapestry above.

The curved yellow stick outlining the moon contains the many short pieces of saguaro ribs.  This gives the moon a myriad of craters.  The moon's light rays are simulated by the painted sections of saguaro rib.

I have enjoyed the simplicity and bright color scheme of this piece and it has drawn numerous positive comments.

Ed & JoAnn's website  <apatchablue.com>

Thursday, December 27, 2012

Birdseye Maple and Vinigar #16

That is an ambiguous title so what does it mean?  I am going to tell you about one of my e/p vessels that I have just completed.  The main construction materials are Birdseye maple and resin.  This vessel is built around an empty, slender, glass vinegar bottle.  It was salvaged from my wife's kitchen and the wood was scrap from a cabinet shop.  As I use resin the excess from a job is always poured into a plastic pill bottle.  When the resin has hardened it can be removed from the bottle and shaped to fit the particular need.  In the photo below you can see the materials for Vessel e/p IV.
The bottle slips through the hole in the triangular box and the thick wood base on the left is fastened in place.  On the right side of the photo is a pile of Birdseye wood pieces cut to form bricks.  The rough shaped resin pieces for the sides and top of the vessel can also be seen close to the right of the box.

.The next photo show the application of the wood bricks on the sides of the vessel, leaving an area open for placement of resin half-spheres.  The top resin piece is fit around the bottle to make a liquid tight seal.  A resin top surface will be poured to hold it in place.

This third photo on the left show the grout has been placed between the bricks and the resin top has been poured.  Wood corner molding is in place and all surfaces have been sand smooth.  At this point, before the resin half-spheres are attached, we analyzed the design of the vessel as it had bothered us.  Who is this "we" you ask?  I am fortunate to have an artist with extensive experience and knowledge of design and color working with me; my wife JoAnn.

The fourth photo shows the finished vessel with a new top,cast over the original top piece.  This new top has more weight to balance the piece and just a slight change in radius to make it interesting.  The final photo, shown below gives a close-up view of the half-spheres which are a major part of the design.  If you have questions about any part of this post you can e-mail me at comcast
.net.  Your comment to this post or previous publications can always be made in this blog at http://apatchablue.blogspot.com.

Saturday, November 17, 2012

Antique Wood Lathe #15

A woodworker or an artist usually has a favorite tool.  Over time this love affair may become quite strong.  In my case our ranch home didn't have electricity nor did the country school I attended through the 7th grade.  In the 8th grade wood shop I attended in city school they had a wood lathe.  I didn't get a chance to use it but watched other students turn out round objects that fascinated me.  As a high school freshman AG student I was given an assignment to turn a mallet head and handle out of solid oak.  I had plenty of guidance so it turned out perfect in my eyes.  I have kept that mallet in my tools all these years and it is shown in the photo below.
The lathe you see behind my mallet is an old wood lathe I bought from the Medical  Lake school district when they were building a new shop and high school.  When I started teaching there in 1958 my wood shop was in one of the school bus stalls in the garage.  I took the job because of the promise of a new facility to teach in the next year.  It was a fantastic facility with all new furniture and  tools.  I had a bank of three new wood lathes so the school sold the old equipment and I got a good deal on the lathe.  It was old and had seen a lot of hard use but with a few new parts and a good cleaning I had a lathe that has served me well all of these years.  I have several projects in construction and others planned that involve lathe work of varying degrees.  One of my vessels that was completed recently is e/p IV shown on the right below.

This vessel has a plastic water bottle as an inner lining and alternating rings of maple and walnut were fit around it.  Each ring was buttered with thickened dark resin and placed on top of the previous ring.  No hole was cut in the bottom ring so it made a secure base.  Smaller rings were used at the top and the central hole was cut to fit the neck of the water bottle.  This assembled block of wood was centered in the lathe when all joints were set and dry.  Shaping the vessel and sanding it smooth on the lathe was the pleasant task of seeing an object of beauty emerge from the rough wood block.  The photos below show the various elements of my e/p Vessel.


Saturday, October 27, 2012

Unique Vessels: How do you make these tings? b #14

This is part two of the review of my book. The post for part one took  you through the first half of the book.  The many steps in creating a Unique Vessel were covered in section three.  This post starts with section four, describing the product or various vessels I made by altering the process to some extent.  This section was created to show a variety of ways to use the basic process for different results.  The important thing I wish to stress is that to create unique vessels you need to take command of the process.  Don't get locked into one way and only one way to create.  My technique is one way, but you will see I employ variations in each of the vessels covered in this section.  I encourage you to be creative.  If you have a different way of creating a vessel, give it a try.  The alternate method may work or if it doesn't, analyze why it didn't, and try another approach.  This is how I developed my process.

Before I begin analyzing my various vessels, direct your attention to information sheets I developed for each vessel.  This provides a document to include with the Vessel when it sells or is given as a gift.  I like to include a photo of the vessel and also a photo of the plant that is the primary wood source.  I often name the vessel with part or all of the woods scientific name.  An examples shown below are my Syringa Vulgaris Vessel and a lilac bushes in full bloom which is the source of wood for this Vessel.
The information sheet includes notes about the wood sources,  plant growth habits and area of growth and working characteristics.  The lilac is an old plant used by many of the early settlers to landscape around their homes.  Traveling through country once settled by "Homesteaders", deserted home sites are often marked by a lilac bush.  It is a tough plant, often surviving after the buildings are gone.   I gathered the wood for my Syringa Vulgaris vessel from such a site on the outskirts of Spokane, Washington.  I was working at the Community College System at the time.  This source of lilac wood seemed appropriate, as Spokane is known as the Lilac City and each spring celebrates with a large parade and other activities.

The information sheet also gives dimensions and weight of the finished vessel.  Construction methods and finishing processes are included and hints on care and maintenance can be included as well.  For purposes of reviewing vessels included in this section that used different and unique construction methods, I will try to limit remarks to that specifically.

One of the critical decisions when designing a vessel is what will be used for the core and how it will be removed.  The Mexican Bird of Paradise used a Styrofoam core that could be removed in small pieces thorough the top and bottom openings before the base was cast.  In this lilac vessel the top opening was too small and the legs on the base complicated removal of a Styrofoam core from the bottom.  The question became, how was the core to be removed after the vessel was stabilized with the wood segments.  The design around the center of the vessel allowed me to cut it in half, remove the core, and unite the two halves and finish over the area.  This is the type of creative problem solving I will highlight in each of the following vessels.  The Mexican Bird of Paradise vessel was covered thoroughly in the first part of the book and illustrates my traditional construction methods compared to construction of these next vessels.

SAGUARO I:  This photo shows the vessel next to the giant cactus that supplied wood ribs for its construction.  Ribs are salvaged years after this giant has met its demise from natural causes and the fleshy part of the plant has decayed, leaving the ribs clean and intact.  The vessel is smaller at the bottom and top.  A brass ring at these extremities holds the ribs in place and a disk spreads the ribs to form the bulging center.  There is no core used in the construction of this vessel.  Pieces of fiberglass cloth were adhered to the inside of the vessel and a resin grout was spread over the outside of the cloth between the ribs.  When the fiberglass and resin grout cured, a strong shell was formed, locking the ribs in position.  The disk used to spread the ribs, designed to be disassembled, is removed and the surface is patched inside where it made contact.  This unique vessel is open at both ends.

 ROBLE NEGRO ROCA:  This  vessel is unique because the Styrofoam core was left and  supports the brass tubes mounted flush with the top surface.  They are in place to hold decorative arrangements.  The vessel was constructed from wood of a large, downed Emory Oak, also known as Black or Blackjack Oak.  


CUBISTIC PROSOPIS:  This vessel is made of wood from a large dried Mesquite log.  The central portion was shaped over an  industrial balloon while the top and bottom sections were fashioned from solid Mesquite wood.  The central section is covered with Mesquite cubes.  The solid top section has been hollowed out and attached over the opening in the mid section that I used to extract the balloon from.  This takes place after the cubes have been attached to the fiberglass shell.  Notice the worm holes in the top section.  The dimensions of this vessel are:  52"h x 30"diameter and it weighs 68 lbs.

SOVEREIGN ANTIQUITY:  I call this vessel the Rose Bowl because it is constructed with segments of rose cane.  It was formed by draping fiberglass cloth over a 12" balloon and maintaining the irregular edge as wood segments were added.  The inside of this vessel is finished with a smooth coat of tinted resin and petroglyphic figures were added to this surface with a small paint brush.
ELATA:  This vessel is constructed in the standard way over a Styrofoam core that is removed through top and bottom when wood has been applied to the outer surface.  The unique design of this vessel is the use of lengthy pieces of Soaptree Yucca seed-stock on two edges of the art piece and segments of wood on the curved surfaces.  This gives the impression of a stack made up entirely of seed-stock sticks.  The Soaptree Yucca grows throughout the region at elevations of 3,000-5,000 feet.  The seed-stalk supports a mass of fleshy cream-colored blooms high above the plant and when mature the blooms produce pods that hold thin, watermelon shaped seeds.  The flower clusters are heavy and bend the stock which made it difficult to find straight lengths for the vessel construction.

SOUTHWEST  I:  The variation in this vessel has to do with pottery chard's that have  been added to the surface to complement the Eucalyptus segments.  The broken chard's were added to the vessel last, before finish was applied.  Other elements of this construction follow the standard process. This piece  illustrates that an unlimited variety of material can be used on the surface of the vessel, limited only by your creativity and imagination.  The Eucalyptus wood came from small limbs.  Native to Australia, these huge trees are now common around the southwest.  They can grow 10 to 15 feet per year under good conditions and reach a height of 120 to 150 feet.  They may live for 100 years.


APHYLLA:  This, my tallest vessel, stands 93" high with a 14" octagon base.  This construction method used was a great departure from standard.  No core was used.  The base octagon and a smaller top octagon were cut from 3/4" plywood and a hole drilled in the center of each.  A long closet pole was passed through the holes.  Four, 8' x 4" strips of 1/8" veneer were fastened to every other side of the octagons.  The base was securely fastened to the pole so that it could not turn.  The top octagon was then rotated 45  degrees and locked to the pole.  This twist brought the 4" wide strips of veneer together as a square shape in the center of the vessels height.  Tapered veneer gussets were cut to finish the vessels top and bottom surfaces.  A fiberglass coat was applied to all of the veneer and then the Tamarisk or "salt cedar" segments were added.  The shapely top is fashioned from a solid piece of Tamarisk.

PLATANUS:  The core in this vessel was created in a unique way and only part of it was removed.  I started with two 4' rings of 1/4" plywood.  Each ring was 2" in wide, so quite limber.  Canvas sheets were stretched and stapled to one side of each ring and the surplus material cut away.  Rings were then fastened together with the canvas side out.  The wood top opening and  base piece were inserted between the rings and fastened in place.  Padding inserted through the top opening bulged the canvas to develop a convex surface shape on both sides of the vessel.  A fiberglass shell was then developed on the canvas sides and wood pieces were attached to the shell.  After the resin grout was cured, the padding was removed and the vessel held it's shape.

CATCLAW CUP:  The Catclaw bush has curved thorns that resemble a cats claws, thus the name.  The vessel in this case is called a cup and is securely nested in the section of the branching Catclaw limb.  Catclaw segments are used on the base of the cup and mesquite solid wood used for the remainder.  A fiberglass shell covers the Styrofoam core for the cup.  It was an easy task to remove the core through the large top opening of the cup.  The combined height of this assemblage is 22".  This is an example of the vessel being used as a part of the art piece rather than the vessel as the art piece.


CHOLLA TEA:   This is one of my first  teapot vessels.  It starts with the standard Styrofoam core and fiberglass shell.  The appendages such as the handle and spout are built separately and added as the wood segments are attached.  The wood used is the Cholla skeleton or inner structure of the plant.  Pieces of this skeleton are filled with resin and when cured they are cut into segments.  This is a natural attractive wood.

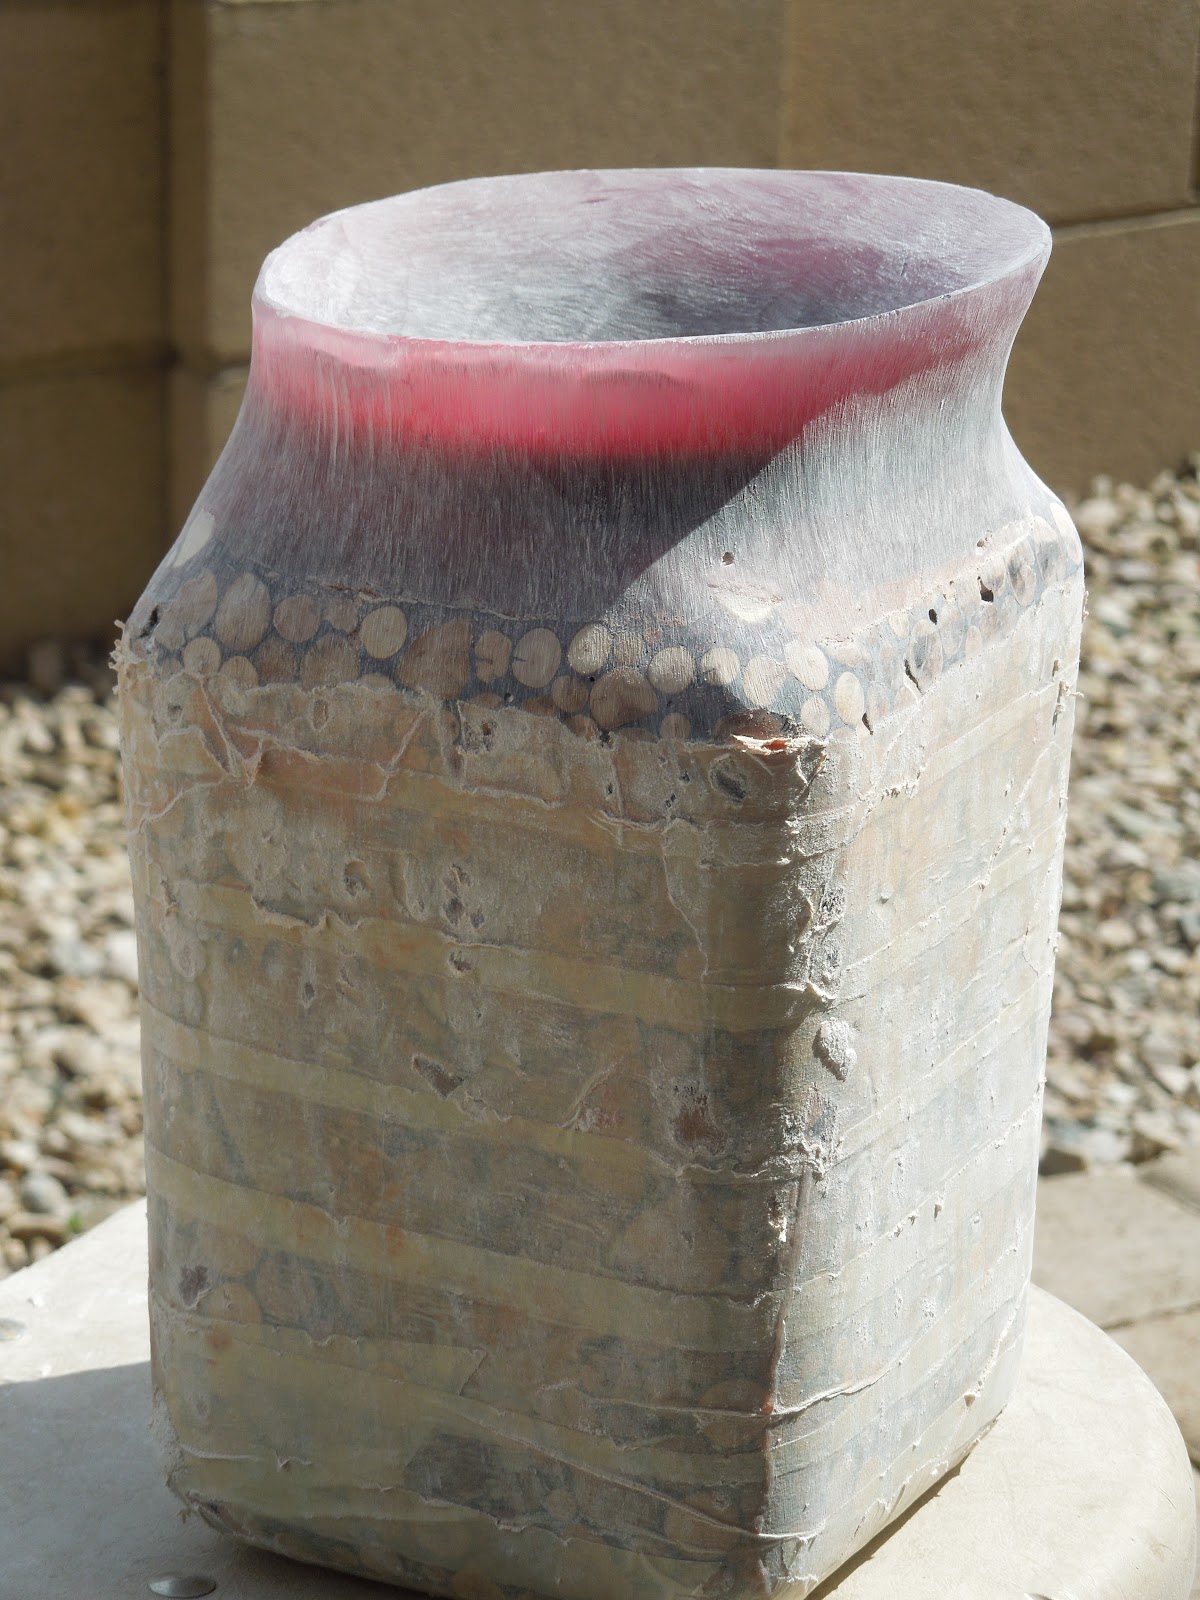
EMPTY/PROMISES  I:  This is the last of the special exception vessels I will show, and it is the most dramatic approach of those that have been covered.  I am developing a series of vessels using this approach.  Several previous posts highlight specific applications to vessels in this series.  With as little overlap as possible I will describe the characteristics of this series.  The title for these  vessels refers to the use of empty containers as the core of the vessel and the 
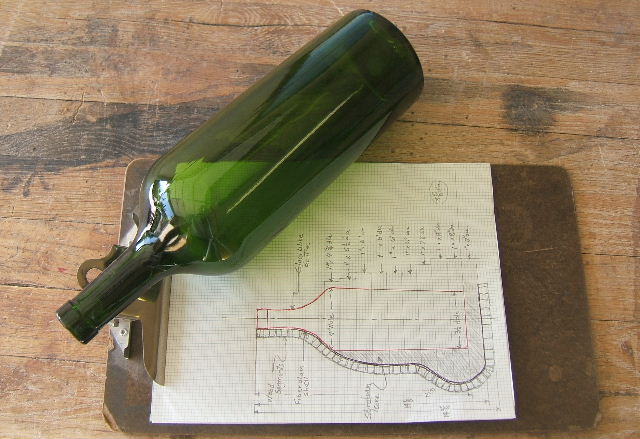
promises is the added value given in the final product.  This piece starts with an empty wine bottle and the final shape is quite different.  There is room for individual creativity and a simplified work plan.  A construction guide in my book furnishes necessary information for constructing  Empty/Promises.  These directions can be used with any vessel of this style.  Give it a try?


The book's conclusions are brief.  I encourage you to take bold steps to explore your skills.  The Appendixes are the last pages of the book. Appendix A gives insight into my artistic accomplishments, while appendix B is my published statement used for art shows I participate in.  The last two appendixes may be more useful to you.   Appendix C is information about materials.  They are listed in categories such as: core materials, shell materials, casting materials, and modeling materials.  Finally, I have included my list of illustrations, and this concludes the review of my book, "Unique Vessels: How do you make these things?"  Thank you for your interest.


Wednesday, October 17, 2012

Unique Vessels: How do you make these things? a #13

                                                                                                                                                                                                                                                                                                                                                                                                                       
My book stresses the steps taken to plan and construct a vessel of a series referred to as "Unique Vessels".   I received numerous questions about my construction methods, so decided to put the answer in a book.  This picture and information has been placed on the home page of this blog.  By clicking on my blog book you will be linked to my page in Amazon.  There is more information available on the Amazon page, including the feature that enables you to look inside.

I wish to comment on several features of the book that may entice you to look in Amazon.  I took all 131 pictures used in the book, many with a tripod and timer.  Scurrying back to the set-up of the scene after the camera had been triggered, took accurate timing and planning.  I incorporated photos of my art pieces in the book where open space could be found.  I thought this might aid the reader in understanding my focus on unique, free form vessels. They incorporate native woods as well as a variety of other materials.

After a brief introduction, the remainder of the book is presented in six units of content and appendices.  The first is a history of my first attempts to create unique vessels.  It took a number of failed attempts to finally discover the method that works for me.  I still have that first attempted vessel (see right) to remind me of the evolution my process went through. 

The second section, a page + in length, gives my goal for creating this series of vessels.  Presenting materials from local native plants, was intended to acquaint the viewer with the beauty of the woods.  The vessel pictured below is a good example of this.  This vessel is made entirely from Palo Verde, the state tree of Arizona.

The third unit of the book is the longest and incorporates the most photos.  This is where I present the detailed steps of my process used to make a unique vessel.  These instructions are accompanied by photos illustrating the specific content being presented.  This is occurring in real time as I am building the vessel as each step is explained.  I chose to build this vessel with wood from the Mexican Bird-of-Paradise.

This shrub can grow to a height of 10' and is native to South America and Mexico, but naturalized in the Southwest.  It can be seen in landscaping over the entire Southwest region.  The shrub's beauty and tolerance to a hot, arid climate more than compensate for it's unpleasant odor and poisonous seeds.


At the conclusion of this lengthy section, the reader will have watched an idea develop from a plan sketched on paper to a bright colored vessel.  Typical problems encountered along the way gave me the opportunity to show realistic correction choices.  The final results of this bright, colorful and shapely vessel pleased me and hopefully you readers.


This concludes part one of the review of my book, "Unique Vessels;  How do you make these things?"  My next post,  (part two) will discuss section four which elaborates on variations of the process I have used on thirteen  various vessels.

Thursday, October 11, 2012

e-P Vessels llla and b - SAGE #12 sage


I have just finished two new vessels that I would like to tell you about and show several photos.  The reason I'm presenting these two together is they are identical twins except for size.  The empty   containers  are blue gin bottles, Bombay Blue Sapphire,  one large and one smaller.

Before we get into my construction techniques, I will explain why the word sage is included in the post title.  Sage brush wood is the main decorative wood used in these art pieces.  I was fascinated by the shapes exposed when a cross-cut was made in this wood.  The color and grain pattern are very pleasant.  I collected this wood while living in Wenatchee, Washington.  This was in 1979 when I had just  married   JoAnn.   We built in the foothills above the city.  It was a fun time and we loved our home that we had designed.  Here is a quick peek at Apatchablue, the name we gave our home.  The vacant property next door had sage brush growing over it as seen in this winter photo.  Due to  a job change we began living in a Spokane apartment five days a week and spending weekends in our Apatchablue in Wenatchee.  One summer weekend we returned to Apatchablue to find the adjacent property had burned, and just sage stumps remained on the blackened hillside.  We found that our neighbors had kept the fire from jumping to our home.  I gathered the sage stumps for future art work and these e-P vessels are the first opportunity I have taken to use the wood.  As I worked the wood it gave off a strong smoke odor and some of the segments in the vessels have slight scorched edges still vi sable.  After all those years these factors are a strong reminder of how lucky we were to have good neighbors.

                                                                                     I decided to encase the blue bottles in wood, fashioned with a pointed top and extended access to the opening of the container.  The entire surfaces of these boxed bottles was fiber glassed and then the wood pieces were attaches.  Mahogany strips were used to outline and divide space on the flat surfaces.  The same strips were used to cover the pointed sections.  As in other vessels, the resin grout was worked in all spaces between the wood segments and strips.  An orbital sander was used to work all flat sides into smooth surfaces.  A drum sander on a hand drill shaped the tapered round tops.  Voids in the grout were filled at this point and more sanding leveled out the surface. After this rough sanding, plenty of time was taken to work the surfaces down to a fine finish.  Much of this was done by hand with successive finer grades of paper until 400 grade finished the piece, ready for rubbed oil and wax coats.


You will notice I turned mahogany stoppers for each vessel.  I have an old wood lathe that I purchased as surplus property from the high school where I was teaching early in my career.  It has worked fine for me the many past years.  I have several other vessels under construction that require lathe work.

This pair of vessels measure 20" and 26" in height.  Their base dimensions are 4" and 5" square respectively.  In closing I wish to mention that this big/little twin option will be used on several other vessel designs, when I find appropriate  empty vessels.  It is a unique way to produce sets that may attract buyers.  They could be priced separately or per pair.  These were fun to make and I plan to devise another project that uses sage segments.  If there are questions you have relative to this post. please contact me;   also I would appreciate knowing if you have done similar work.  I enjoy sharing.   Ed

Saturday, October 6, 2012

e-P Vessel II #11

My post of 9-18-12 on the e-P Vessel series I am developing showed the first vessel in it's different stages of construction.  Explanation of the series title, "e-P Vessel ..." was that the "e" stood for some variety of empty vessel I would be using as a core in the art pieces.  The "P" stands for the promise of creating an artful vessel based on the recycling of plastic, glass, wood, etc. throw-away containers.  That first e-P Vessel was based on an  empty wine bottle.   The subject of this post, e-P Vessel II, is based on the nut jar at left.  You may have noticed it isn't quite empty but we can take care of that detail in short order.  I'll discard the blue lid and try to remove the label although it shouldn't show when the piece is finished.

A wood box will be constructed to cover all sides including top and bottom.  An opening in the top wood piece will fit close  around the container's opening.  Slices of grape vine trunk are affixed, one to each flat side and a smaller variety of Manzanita sections will cover the remaining surface area.  A black resin will be used to fill space between all wood pieces.

After the resin has cured all surfaces will be sanded smooth and flat.  The corners will be rounded.  As a result of this sanding, areas will be exposed where the resin hasn't completely filled spaces between woods segments.  Refilling and sanding solves that problem.


The sanded surfaces will be covered with masking tape for protection as we shape a clay model of the top and cast a plaster mold over it.  When the clay is removed the mold will be filled with tinted red and blue resin that results in the variegated lavender cast top.  The mold is ground away and the finish sanding begins.  When the tape comes off there are always little spots that need repair, but that is easy with matching colored resin.  The key to a beautiful piece is not to stop sanding too soon.  Sanding is the process of turning big scratches into small ones.


The finish I like and have used on most of my wood art pieces is several coats of oil rubbed in; and finish with at least two coats of paste wax, buffing each coat before applying the next.  This gives a finish that can be spot refinished if damage occurs and it will blend perfectly.                               

So there you have it:  e-P Vessel II.  I have been thinking about writing a book about this series when I have more pieces finished.  It seems like an endless subject.  I would give more detailed information about the construction, similar to the e-P Vessel I, as covered in my other book, "Unique Vessels:  How do you make those things?"  You can check that out in my book shown on this blog.  Other vessels are shown on my web site.  Watch for other e-P Vessel's posted here and on facebook and Pinterest.


Edwin K. Hill
apatchablue3@comcast.net
Web site;   apatchablue.com
Blog:  Apatchablue Studio
Pintrset:  (to be announced)


Tuesday, October 2, 2012

Birthday Horse #10

My wife JoAnn, and I are enjoying our granddaughter, Zoey, as she matures.  She and her family live only 25 minutes from our house.  From the day she was born we have been a part of her life.  When her mom and dad wanted to go out for the evening, guess who were the babysitters.  We were present at all birthdays and holidays as well.  Zoey is now a junior in high school, six foot tall and soon to be sixteen years old.  The baby sitting days are over, but there are lively conversations about school and classmates at our traditional Sunday dinners.

I want to start this post back when Zoey was turning three years old.  We were told that at that age she could have a horse;  that's a rocking-horse of course.  We wanted to make one for her that would be special and she would value later in life.  After thumbing through books and magazines we found a book with all of the answers.  "The Rocking-Horse maker" by Anthony Dew.   The book covers nine easy-to-follow projects with the easier ones well within the scope of anyone with a basic tool kit and modest skills.  This is a British author and publisher, which made me wonder about availability of metal parts here in the United States.  A California source was cited for the few metal parts we would need for our chosen model.  I have metalworking skills so decided to make the parts.  Anyone with skills in this area or a friends that will do the metal work for  you can proceed like we did.  If you strike out on both options, you will have to order the parts from California.  The book is still available at Amazon.

We decided to build the mid size three-dimensional carved horse and use Mahogany as our wood choice.  Final dimensions are 4'h x 5'l x 18"w.  We liked the rich red color of the wood when finished and we didn't choose to paint on any details.  Regular horsehair was used for the main and tail, and eyes were purchased from a taxidermy store.  Leather was purchased for our saddle and halter.  A decorative blanket was constructed by JoAnn on her sewing machine.  We  were both enjoying the project and excitement grew as the horses shape began to emerge from the blocks of wood.  We built in a surprise that may never be found.  A time capsule was placed in the hollow body section before the final blocks were glued.  We composed a letter to Zoey expressing our love for her and wishing  her a full and exciting life ahead.  When we presented her with the horse, we told her folks of the time capsule and as of today, thirteen years later it is still intact. 

We probably spent several hundred dollars on construction supplies and it took a bit of poking around town to locate them.  We were floored when Zoey's mom showed us a page from the FAO online New York catalogue.  There was our rocking-horse in Mahogany and a proud little Brit in the saddle.  The Stevenson Bros. of England were marketing it as .."made by the world's finest rocking horse makers".  Only 300 were created each year with European royal families at the head of the list.  It was characterised as an heirloom-quality gift to be treasured for generations and priced at $5,400.

The purpose of this post is to start you thinking about the things you can do with a good plan, a few tools and a desire to create.  In this example, look at the value we created.  You can too.


Zoey and her Birthday Horse

Saturday, September 22, 2012

Tobacco Tree #9

My passion is working with wood, and sinse coming to Arizona I've discovered some very interesting specimens.  I have collected over fifty different woods, mainly from the local desert.  A valuable resource I have used in this quest is the field guide,"Woody Plants of the Southwest" by Samuel H. Lamb.  It has descriptive text, drawings and photographs of the many plants in this area as well as range maps showing the location of concentrated growth of specific plants.  This book shows a copyright of 1989, but I found the information accurate and extremely helpful.  The one drawback is it's lack of color, but when color is necessary I refer to, "A Field Guide To The Plants Of Arizona" by Anne Orth Epple.  Beautiful colored photography is supplied by Lewis E. Epple.

I would like to focus on one particular plant in this post, the Tobacco Tree.  I had always associated tobacco with the low growing, big leaf plant grown commercially in the southern states.  In fact, my grandfather who liked to experiment, grew one or two tobacco plants of this variety on his Montana ranch when I lived there as a young boy.  The concept of a tobacco tree was completely foreign to me until I saw one in Arizona.  They are considered large weeds here and show up along roads or disturbed areas of soil.  A specimen grew to about twenty feet in height,  in an area where the septic drain field for our new home had been installed.  I cut it down and boxed the wood to cure for future use.  The larger diameter pieces have a central hole with wick like growth, that transports moisture and food to the upper reaches of the tree as it grows.  (see photo of a section of my tobacco wood below)

The tobacco tree is native to South America and was introduced in the United States but escaped cultivation.  It now can be found where the birds plant the seeds in the southern parts of California, Arizona and New Mexico in elevation below 3,000 feet.

The plant contains an alkaloid (nicotine) said to be poisonous if swallowed.  An insecticide produced by brewing the product is effective on aphids.  The plant is also being investigated for the production of bio fuel.

The Tobacco has long green leaves and the blossoms are long, tubular in shape with a yellow green color. (see photo right)                         


                                                               Wood from my Tobacco Tree is still in the box.  I have no plan as yet for a vessel that this wood might complement, but with my thinking focused on the Tobacco Tree, a design may now come to mind.  The anti-smoking concept might be a place to start.  Tobacco is a killer and I saw the death scenario play out with an office partner and  friend of mine.  I was smoking sporadically at the time and trying to get rid of a hacking cough.  When I realized what was happening I stopped and haven't smoked since.  This is another reason this Tree is significant for me.  If anyone has an idea for an artistic use of this wood I'll give you credit in literature developed about the art.  To get a flavor of the type of art I do, take a look at my book, Unique Vessels... shown on my web site; www.apatchablue.com.  Thanks.
                                                 

Thursday, September 20, 2012

Cholla Heaven #8


My wife, JoAnn and I moved to Arizona in 1998.  I had taken an administrative job at one of the community college's branch campuses.  We had been in the state for short workshops and meeting, but never for any length of time.  The landscape seemed quite harsh to us compared to the Pacific Northwest or specifically the Spokane area where we had been living.  So many types of cacti and all with spines that wouldn't let go once you made contact. The giant saguaros were very impressive and easily avoided,  but there were many other types that seem to jump at you if you got close to them.  The cholla cactus has many varieties with one named "jumping cholla".  Other varieties include buck horn, cane,  common and stag horn.  One type had the name, "chain fruit", because the round seed pods hung in strings like grapes.

The appearance of the cholla plant didn't impress us and this scrubby bush covers vast areas of the arid southwest.  It can give the cattleman problems when it invades pasture land.  Then we experienced a pleasant surprise.  The cholla blooms are different in color on different bushes and while some are a pale and uninteresting, while others are vivid reds, magenta's and rusty tones.   Our impression of the cholla improved when it was pointed out that it's fruit is eaten by a wide variety of birds and desert animals.  Further, the plant provides  protection for birds and small animals.  I guess it would be like the deserts version of the brier patch in the old fable of Barer Rabbit.        

The exciting thing about cholla is the wood it leaves behind when it dies.   The small dead branches are hollow, with a network of lenticular holes.   This gives the cured stick a lace-like appearance.  The wood is tough and hard, suitable for use as a cane.  I have enjoyed working with it and will show a few examples at the end of this post.   When the stick is cut across into small segments, the cut surface resembles flower petals.  Cholla now plays a significant part in my art work and there seems to be a never ending supply.which most people are pleased to be rid of.

It's amusing how our likes and dislikes changed with time and additional information.  JoAnn and I decided to retire and stay in Arizona.  What we had perceived as a harsh landscape has turned into an interesting and unique place to live.  We sold our retirement property in California's wine country north of San Francisco and now live in Cholla Heaven adjacent to Tucson, Arizona.


Cholla Teapot


Tuesday, September 18, 2012

e/P Vessels I #7

The common dictionary definition for vessel is a type of hollow container used for holding liquids.  What then is an e/P vessel?

Over the past thirty years of my artwork career I have created numerous vessels, but few ever were intended to hold liquids.  At this point I am planning a series of vessels that will meet the criteria of holding liquids.  But what is this c/P business?  In a way it notes my wish to join in the movement to clean up our environment;  to join in the green movement;  to save the planet.  Whee! I got a little carried away there, but seriously,  think of the tons of glass and plastic containers that go in the dump every day.  Yes, I know there has been some progress made with recycling these items, but there is plenty of room for others to join in and that is what I intend to do with my new series of vessels.

By now you may have figured it out.  The "e" in the description of my new series stands for all those empty containers on their way to the dump.  It is a huge amount of refuse.  I have chosen a small e because of the small impact my plan will have on the overall situation.  Not to diminish any effort, remember "a long journey starts with the first step".

Now for the "P".  That may be somewhat harder to decode, so let me lay it out for you.  My vessels will include an "empty" container as the core element and with creative treatment around it, will evolve into a "Precious" container that holds liquid.  I want to emphasise the creative treatment around the core so all e/P vessels don't resemble a wine bottle shape with a few frills.  Let me illustrate what I envision as a creative treatment with the following evolutionary steps of my first e/P vessel.


1.  Plan your work and work your plan.


2. Styrofoam fit around bottle.


3.After shaping Styrofoam and applying
a protective coating, cover entire surface
with fiberglass cloth.


4. Attach wood segments and
grout spaces between.


5.  After final sanding apply two
coats of oil finish.  When completely
dry apply two wax coats buffing each.


6.  Fashion a top stopper with cork attached.
Sign the bottom and e/P I is finished.


 This description does not cover all steps in
 detail, but should give an idea what a creative
 finish around the container could entail.  For a
 more complete treatment of this process refer to
 my book:
 "Unique Vessels: How Do You Make These Things?"
 It is featured in my blog,
              www.apatchablue.com